
Welcome! This blog post features a guided tutorial of how to draw a winding wall in 2 point perspective. This activity helps artists to build skills using the elements of art: SPACE. Artists can create a sense of space in an artwork by using linear perspective.
Hey educators! Scroll below if you are interested in a ready-for-the-classroom version of this tutorial!
To begin, all you will need is a ruler, pencil and piece of white drawing paper! Once sketched with pencil, you can add color using any color tool of your choice. Some recommendations include bendable colored markers, oil pastels, watercolor and more! Let’s begin!

IMPORTANT THINGS TO REMEMBER BEFORE YOU BEGIN!
As you create this guided perspective drawing, be sure to keep all pencil lines very light. It is also important to review the 3 need-to-know lines for a perspective drawing. The first type of lines are diagonal lines that converge toward the vanishing point. Additionally, perspective drawings will also include straight, vertical lines which meet with the horizon line at a 90 degree angle, and horizontal lines that are parallel to the horizon line.


STEP ONE:
In the middle of your paper, use a ruler to draw a horizon line. Draw two vanishing points on each side.
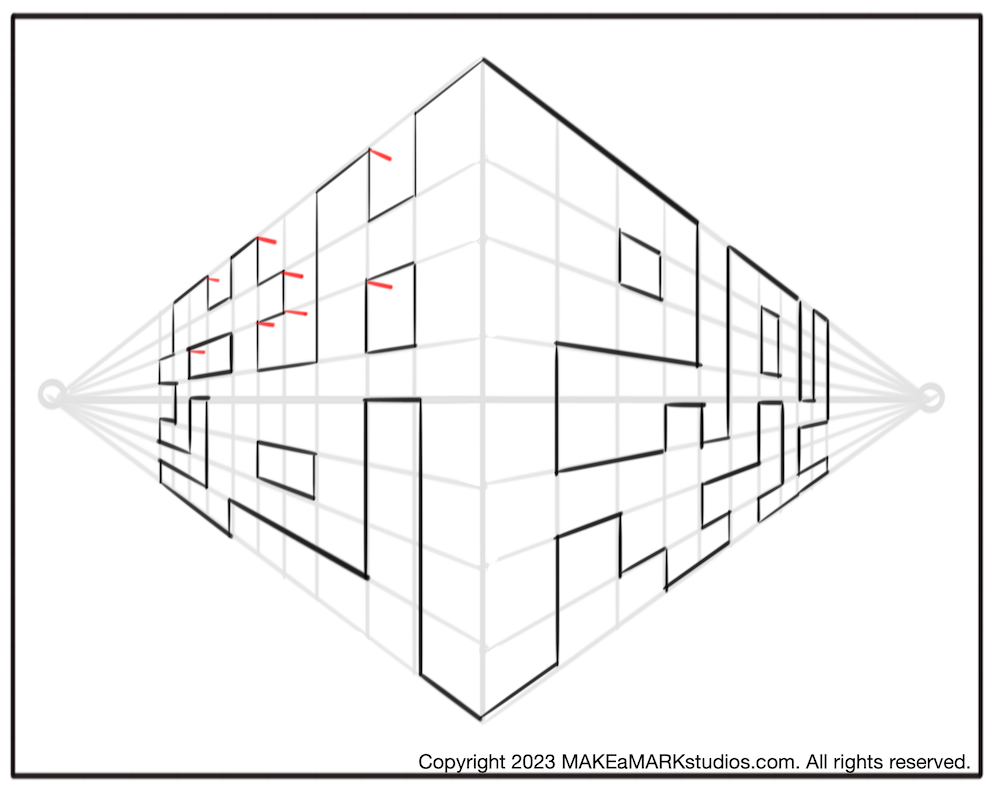
*NOTE* In this tutorial, added steps will be drawn in red. It is recommended that you draw these steps light. Draw it light ’til you get it right!*

STEP TWO:
Draw a vertical line down the middle that goes close to the top of your paper but does not touch it.

STEP THREE:
Connect all four points to create a diamond/kite shape.

STEP FOUR:
Make a mark that divides the upper half in half again.
Make a mark that divides the lower half in half again.

STEP FIVE:
Use a ruler to connect each mark to vanishing points on the left and right side.

STEP SIX:
Along the vertical line, make marks that divide each section in half again.

STEP SEVEN:
Connect each mark to the left and right side vanishing points.

STEP EIGHT:
Draw 10 vertical lines on each side. Be sure these lines are straight and meet at the horizon line at a 90 degree angle!
As the lines go towards the vanishing point they will get closer together.
Strive for a square shape created on each of the tiles.

STEP NINE:
Lines should be drawn lightly, erase out slightly if needed.
Now, begin adding in at least 4 “window.”

STEP TEN:
Using the 2 point perspective grid drawn, create a winding wall that serpentines through the grid. Add more windows if you’d like.

STEP ELEVEN:
Finalize the winding wall on the other side.

STEP TWELVE:
In the upper left quadrant, begin to add 3 dimensions to the wall. Use a ruler to draw a line that goes to the right side vanishing point on the opposite side.
Strive to make each of the fill “half” of the tile square.
STEP THIRTEEN:
Draw vertical lines that drop down from the angled corner lines drawn.

STEP FOURTEEN:
Draw lines to represent the bottom side. These lines will angle towards the vanishing point on the left.

STEP FIFTEEN:
On the bottom left quadrant, use a ruler to draw a line that goes to the right side vanishing point on the opposite side.
Strive to make each of the fill “half” of the tile square.

STEP SIXTEEN:
Draw vertical lines that go up from the angled corner lines drawn.

STEP SEVENTEEN:
Draw lines to represent the upper side. These lines will angle towards the vanishing point on the left.

STEP EIGHTEEN:
Repeat the same steps you used to finalize the left side simply in reverse for the right side.

STEP NINETEEN:
Erase/remove any visible lines you no longer need.

STEP TWENTY:
Use a tool of your choice to darken in the dimensional sides.

FINAL STEP:
Finalize the 2 point perspective winding wall with a tool of your choice. Below are some creative ways to incorporate color and value into your composition.


My advanced middle school art students completed this project. It took about 5 (45) minute class periods. I guided them through the first few steps to make sure everyone had the basics down. Then, I encouraged them to use a variety of materials to add creative details and find their artistic voice within the composition. The results were great and eye catching! Students enjoyed the process and had fun with perspective… which is not always the case! I love how this project mixes the rigid rules of perspective with endless room for creativity.

Hey teachers!* Click here for my TpT shop if you’re interested in this lesson, which features a full slideshow presentation, printable drawing guide, and a project specific grading rubric.
Thanks for checking out this blog post. I would love to see your creation if you use these steps to create your own 2 point perspective winding wall. Feel free to tag me on Instagram and possibly get featured in this site! Also, please follow Make a Mark Studios on Facebook to keep up with the latest posts! Thanks in advance!
-Stephanie Villiotis, Art teacher and creator of Make a Mark Studios