
Welcome! This blog post explores a project that depicts one cohesive image divided into 7 sections which illustrate the 7 elements of art: line, shape, color, form, value, texture, and space. The elements of art the artists toolbox they can use in an endless amount of ways to create infinite art solutions.
This is a great skill building activity to deepen knowledge and understanding of the elements of art. Included in this post are step by step photos with specific directions. Let’s get started!
*Hey teachers!* Please scroll below for an option to purchase this lesson 🙂

STEPS TO CREATE:
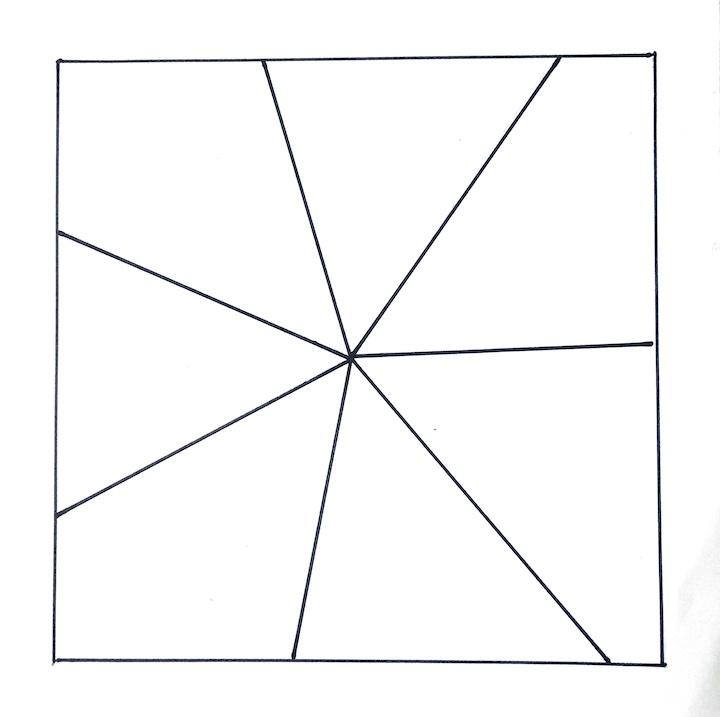
STEP ONE: On a 10” x 10” paper with a 1” border, trace the template which divides your paper into 7 even sections (roughly 51 degrees each). Outline with black marker.

STEP TWO: Lightly sketch out your design with pencil. Draw the contours only! Strive to fill the majority of the box.

STEP THREE // LINE
Divide this area into at least 6 sections. In each section, create a different, intricate zentangle pattern. Explore different line weight (thick to thin) and different types of lines (zig zag, curvy, straight, etc.) Use black marker to finalize.

STEP FOUR // COLOR:
Use colored pencils to create a gradient of cool colors (i.e. purple, blue, green) inside your subject. Then, create a gradient of warm colors (i.e. pink, red, orange, yellow) outside of your subject. Fill the entire section.

STEP FIVE // VALUE
Use pencil to shade in your subject as realistic as you can -or- create a value scale inside your design that blends from light to dark.

STEP SIX // TEXTURE
Use yarn and fabric to create actual textures on your box. Use a glue bottle to attach the fibers to the paper. Explore contrasting colors and fill the entire area.
Another option is to create implied 2d textures in this section using an art tool of your choice. For example, make the leaf look like it has a brick texture by implying this appearance with pencil.

STEP SEVEN // SHAPE
Create a geometric shape paper mosaic using cut pieces of colored paper. Glue down with a glue stick. Keep the spacing fairly uniform between each shape, so you don’t have big “empty” chunks. Avoid overlapping shapes. Explore contrasting colors to define your design.

STEP EIGHT // SPACE
Use a tool of your choice to create a sense of space in this area by creating overlapping. Include one subject that sits on top of your design, and one that is behind your design. With this method, you just “sandwich” your image in between two other things.

STEP NINE // FORM
Use a tool of your choice to render the illusion of 3-dimensionality on your subject. Explore shadows, highlights, and depth.
*Hey teachers!* If you’re interested in this lesson, which features a full slideshow presentation, specific grading rubric and printable 7 section template please click below or check out my TpT listing.

This lesson has become a staple in my middle school art class! Each year, I love to see what the students choose as their subject. Check out a few awesome examples created…

Thanks for checking out this blog post on creating an elements of art project. I would love to see your creations! Feel free to tag me on Instagram and possibly get featured in this site! Also, please follow Make a Mark Studios on Facebook to keep up with the latest posts! Thanks in advance!
-Stephanie Villiotis, creator of Make a Make Studios
Interested in a similiar project that explores the principles of design? Check out this project here.
Thanks so much, Marla! Glad you were able to find some helpful resources!